
I thought the KNAPPA pendant lamp would be a funky alternative to a bedside table lamp and would free up some prime real estate for an alarm clock and carafe on the table. When I picked it up in the lighting section, I was surprised to find it in such a small box. I should have known that there it would come in a million little pieces and be a pain in the butt to put together.
The instructions started off easy enough, but after Step 1, I was a goner. IKEA instructs you to assemble the light upside down and, combined with their half-assed pictures, I could not wrap my head around which way to bend the little plastic bits. I think IKEA should include this warning on all of their instructions: Do not put this product together immediately after a trip to our store. Take a nap or have a big glass of wine to clear your head and calm your nerves.
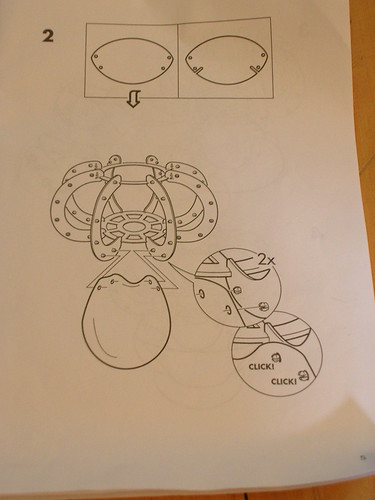
Say what? Which way do I bend this sucker?!
After several attempts, I put the parts down in frustration and decided to come back to it the next day. A good night's sleep and a cup of coffee was all I needed. I threw IKEA's directions out the window (not literally) and flew by the seat of my pants. I decided to assemble it right-side up and - BOOM - it finally clicked. Once I figured out which way to bend the plastic parts, the lamp was assembled in less than 10 minutes.
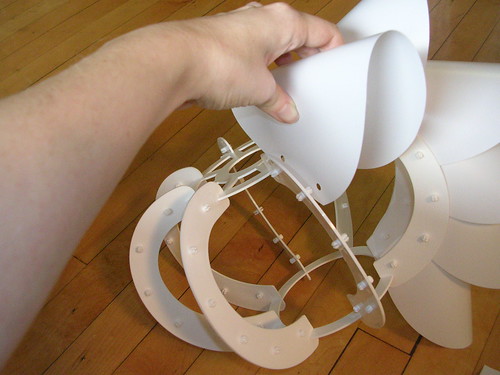
My AH-HA moment! This is the way you bend it.
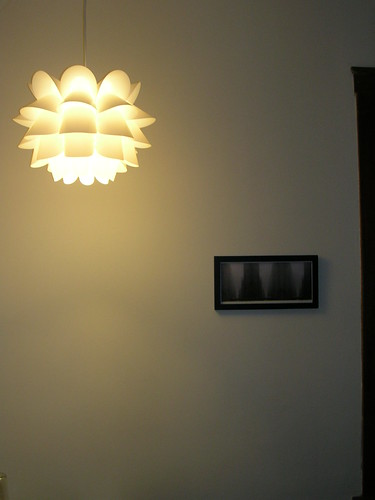 TA DA!!!
I am really happy with the end result and I think it looks great. Plus my bedside table isn't so cluttery! For more photos, go here.
4 comments:
The lamp looks beautiful, and I love how you thought to free up space and avoid clutter by getting a hanging lamp.
So I'm guessing the proximity of IKEA to Rolling Meadows would mean that RM is somewhere near Schaumburg. Very far. Sounds like IKEA made it all worthwhile, though.
I am trying to cut down on clutter!!! At times it can just get out of control. The hanging lamp is working out pretty good so far.
RM is almost the next town over from Schaumburg. The IKEA trip definitely made the day out in the burbs worth it.
thanks a ton for the pics and instructions! my wife did not check the box and it didn't have the instructions in it!!!
"After several attempts, I put the parts down in frustration and decided to come back to it the next day."
That was me, but in my confusion came to the computer, googled and there was your blog! I am SO THANKFUL that you took the time to share this! My daughter was wanting this lamp for awhile, but it was out of stock. I was eager to assemble it so that i could surprise her with it hanging when she came home from school. I completely could not figure it out reading the instructions, but once finding your suggestions, support and PHOTO (the photo was key!) ... i was able to complete the project before she got home. My daughter is so happy with her new lamp! You saved the day :) thanks!
Post a Comment